How to display external images in form and list?
When you attach the image to the record or paste it into rich-content - users will see the images fine.
But what to do if you need to associate external images with your record - for example when you have an externally stored images library of your company products?
Here are several methods to display such images in your apps:
Method 1: Displaying image in rich-text field
- Create a rich text field: in
fields/index.tsor use existing one - for exampledescription
{
    caption: 'Image content',
    name: 'c_image_content',
    textType: 'richtext',
    type: 'text',
},
- Add to layout: place the field on the layout
<section caption="Image content">
    <column>
        <field name="c_image_content" widthFactor="2" showCaption="false" />
        ...
    </column>
</section>
-
Edit the record: go to this record and use "insert image" feature - then select "URL" and paste your external image URL.
-
Result on the form: the image can be seen in this field as shown below:
-
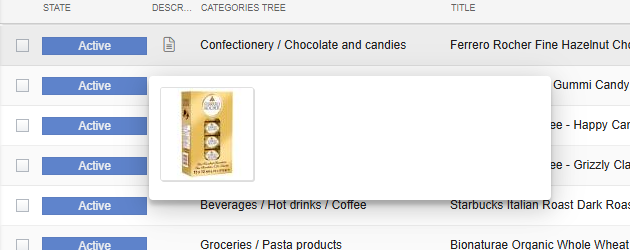
Result on the list: put this field to list - when you hover the content icon - the image can be seen in the pop-over:
Method 2: Using image-only input box + auto-generated rich-content field
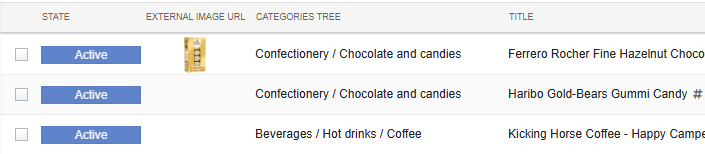
- Configure the image-url field: add 2 new fields in
fields/index.ts:
{
    caption: 'External image URL',
    name: 'c_ext_image_url',
    type: 'text',
},
{
    calcType: 'calcfield',
    caption: 'Image content',
    dependsOn: ['c_ext_image_url'],
    name: 'c_image_content',
    textType: 'richtext',
    type: 'text',
},
- Add the fields to layout: place the fields on the layout in
views/layouts/default.tsx:
<section>
    <column>
        <field name="c_ext_image_url" captionAbove="true" />
        <field name="c_image_content" captionAbove="true" />
    </column>
</section>
- Define the calc-field function: in
fields/calc-fields/index.ts:
export function c_image_content() {
	if (!entity.c_ext_image_url) return '';
	return `<img src="${entity.c_ext_image_url}"/>`;
}
If your users have images on HTTP (not HTTPS), we recommend using a self-hosted or public proxy service. For example, you can use wsrv.nl:
export function c_image_content() {
	if (!entity.c_ext_image_url) return '';
	return `<img src="https://wsrv.nl/?url=${encodeURIComponent(entity.c_ext_image_url)}"/>`;
}
It caches your images, resizes them (if you want), and serves them over HTTPS.
How to use it in your code: You simply prepend their URL to your insecure link.
Pros: Instant fix, no server to manage, free.
Cons: You rely on a third party (if they go down, your images break), and they have rate limits (fair usage).
-
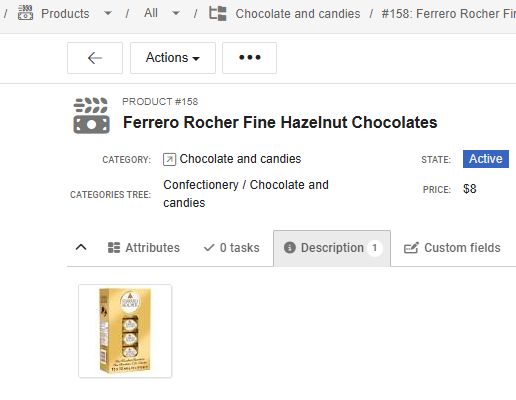
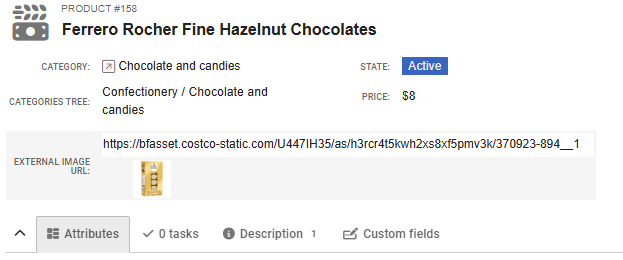
Edit the record: go to this record and edit c_ext_image_url field - paste external image URL there.
-
Result on the form: the image URL is visible as well as its rendered version:

-
Result on the list: put c_image_content to list - when you hover the content icon - the image can be seen in the pop-over
Method 3: Using format-function for the field
- Configure the image-url field: add a new field in
fields/index.ts:
{
    caption: 'External image URL',
    name: 'c_ext_image_url',
    options: {
        gridview_column_max_width: 110,
        gridview_column_min_width: 110,
        plain_renderer: 'format-from-another-field',
    },
    type: 'text',
},
- Add the field to layout: place the field on the layout in
views/layouts/default.tsx:
<section>
    <column>
        <field name="c_ext_image_url" widthFactor="2" />
        ...
    </column>
</section>
- Define the field format-function: in
views/ui-list-code/index.ts:
import type { entity as entityType } from '#typings';

export const c_ext_image_url_format_function = (entity: typeof entityType) => {
	if (!entity.c_ext_image_url) return null;

	const result = {
		text: '',
		text_style: [
			`display: inline-block !important`,
			`width: 100px`,
			`height: 38px`,
			`background-image: url('${entity.c_ext_image_url}')`,
			`background-size: contain`,
			`background-repeat: no-repeat`,
			`background-position: center;`,
		].join(';'),
		tooltip: entity.c_ext_image_url,
	};

	return result;
};

ComindView.addHelperFunction(c_ext_image_url_format_function);
-
Edit the record: go to this record and edit c_ext_image_url field - paste external image URL there
-
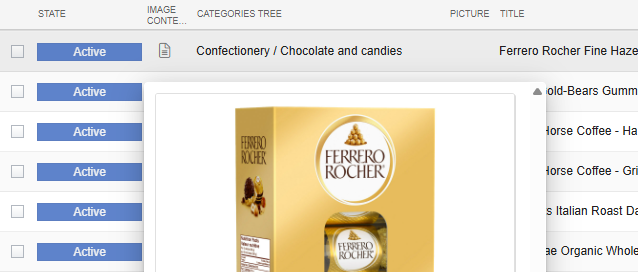
Result on the form: under your pasted external image URL - you can see the image itself:
-
Result on the list: put c_ext_image_url to list - it is immediately visible